Introduction
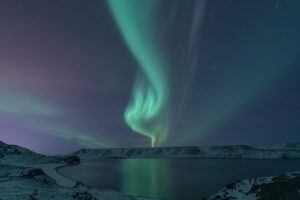
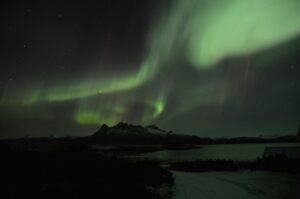
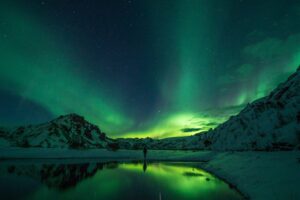
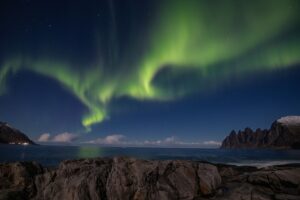
Iceland’s winter sky is a magical canvas, illuminated by the ethereal dance of the Northern Lights. For photographers, capturing this celestial display is a dream come true. However, turning that dream into reality requires the right location, equipment, and know-how.
This comprehensive guide will help you master the art of photographing the Northern Lights in Iceland, with insider tips on making the most of your stay at The Hill Hotel—an ideal base for aurora chasers.
Why The Hill Hotel is the Perfect Base for Capturing the Northern Lights
Ideal Location: Away from City Lights for Perfect Clarity
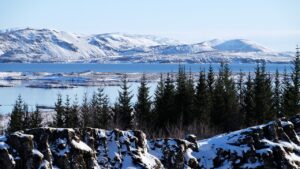
Photographing the Northern Lights requires a dark, clear sky, free from light pollution. Situated in the serene village of Flúðir, The Hill Hotel offers a prime location far from the bright lights of Reykjavik.
This means less light interference and a much better chance of capturing the aurora in all its glory. Plus, the surrounding countryside is dotted with rolling hills and geothermal steam, adding a mystical touch to your photos.
Proximity to Stunning Landscapes for Unique Compositions
The Hill Hotel is not just about location—it’s about inspiration.
Nestled near some of Iceland’s most iconic natural landmarks, the hotel provides easy access to breathtaking backdrops that elevate your photos beyond the ordinary.
From the dramatic fissures of Þingvellir National Park to the powerful Gullfoss waterfall, the diverse landscapes nearby offer endless possibilities for creative compositions.
Aurora Wake-Up Calls to Never Miss a Moment
Nothing is more disappointing than missing a spectacular aurora display because you were fast asleep. At The Hill Hotel, you won’t have to worry.
The hotel offers an Aurora wake-up call service (active until 11pm each night), ensuring you’re alerted whenever the Northern Lights make an appearance. This thoughtful service means you can rest easy, knowing you won’t miss a single moment of the night sky’s performance.
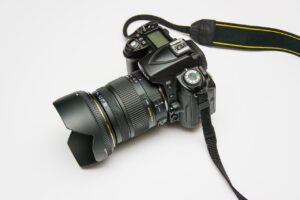
Essential Gear for Northern Lights Photography
Camera Equipment: DSLR vs. Mirrorless
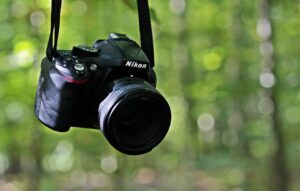
When it comes to capturing the Northern Lights, the right camera can make all the difference. Both DSLR and mirrorless cameras are excellent choices, as they offer manual settings and the ability to change lenses—crucial for night photography.
DSLRs tend to have longer battery life, which is beneficial in cold conditions, while mirrorless cameras are lighter and often have more advanced features. Choose the one that best suits your needs and experience level.
Top tip – I’m an avid photographer myself, and I’ve always preferred Nikon cameras. However, Iceland does not cater to this well – if you need to rent a lens of replace a lens, Canon and Sony is the way to go. Sony also holds the best camera for filming in lowlight, so if you’re looking for real-time playback, definitely check them out.
Recommended Lenses for Night Photography
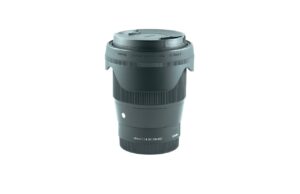
A wide-angle lens is a must for Northern Lights photography, as it allows you to capture as much of the sky as possible. Look for lenses with a low f-stop number (f/2.8 or lower) to let in more light, which is essential for shooting in dark conditions.
Prime lenses are a great choice, but if you prefer versatility, a zoom lens with a focal length range of 14-24mm or 16-35mm will serve you well.
Tripods and Accessories: Stability is Key
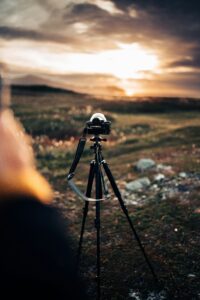
A sturdy tripod is non-negotiable for capturing sharp images during long exposures. Choose a model that can withstand windy conditions and uneven terrain.
Consider investing in a remote shutter release or using your camera’s timer function to minimize camera shake. Don’t forget spare batteries, as the cold can drain power quickly, and a headlamp with a red light mode to preserve your night vision while adjusting settings.
Clothing and Gear to Keep Warm During Long Shoots
Staying warm is crucial when you’re outside for hours in freezing temperatures. Dress in layers, starting with moisture-wicking base layers, followed by insulating mid-layers, and topped with a waterproof and windproof outer layer.
Don’t skimp on accessories: a hat, gloves, thermal socks, and a good pair of boots will keep you comfortable and focused on your photography.
Camera Settings for Capturing the Northern Lights
Optimal Aperture, Shutter Speed, and ISO Settings
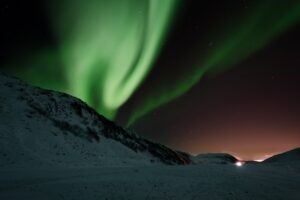
Getting the right camera settings is key to capturing the beauty of the Northern Lights. Start with an aperture of f/2.8 or the widest your lens allows to let in maximum light.
Set your ISO between 800 and 3200, adjusting as needed to balance exposure and noise. Shutter speed will depend on the brightness and movement of the lights—start with a 5-10 second exposure and tweak based on your results.
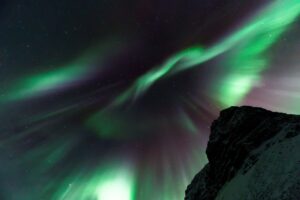
But, here’s the beauty of the Aurora – it keeps changing.
When it’s weaker and slower moving, a longer exposure is needed. But, when it starts to breakdance faster than Raygun at the Paris Olympics, you need to be quick to adjust your ISO and shutter speed or it can look like you just stepped out of supernova when reviewing your shots the next day.
How to Focus in the Dark: Techniques and Tips
Focusing in low light can be challenging. Switch your lens to manual focus and set it to infinity. Use live view on your camera and zoom in on a distant bright object, like a star or the moon, to fine-tune your focus.
Take a test shot and check your image to ensure the stars are pin-sharp. If not, make small adjustments until you achieve crisp focus.
Setting Up Long Exposures for Perfect Shots
Like everything in life, the perfect camera settings for Aurora long exposures require balance.
Long exposures are essential for capturing the movement and vibrancy of the Northern Lights. Start with an exposure of around 10 seconds and adjust based on the aurora’s activity.
Too long, and the lights will blur together; too short, and they may not appear bright enough. Experiment with different exposure times to find the sweet spot for the conditions you’re shooting in.
Using Manual Mode: The Best Approach for Aurora Photography
Manual mode gives you complete control over your camera settings, which is crucial when photographing the Northern Lights. It allows you to adjust the aperture, shutter speed, and ISO independently to achieve the perfect exposure.
Practice using manual mode before your trip so you’re comfortable making adjustments in the dark.
The last thing you want to be doing is figuring it out in the dark and the cold, trust me (been there!)
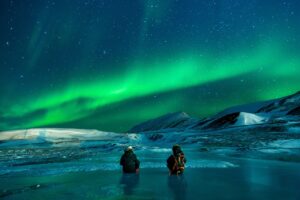
Composing Your Shot: Making the Most of Iceland’s Landscape
Utilizing Iceland’s Unique Features for Dynamic Shots
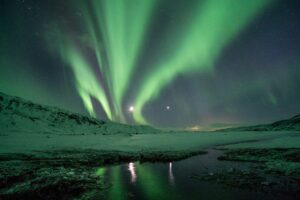
Iceland’s landscapes are as diverse as they are stunning, providing endless opportunities for creative compositions. Use the terrain to add depth and interest to your images—place mountains, rivers, or geothermal features in the foreground to complement the aurora’s sweeping arcs. Consider leading lines, such as waterfalls or streams, to guide the viewer’s eye through the scene.
Framing the Lights with Iconic Landmarks Near The Hill Hotel
The Hill Hotel’s proximity to some of Iceland’s most famous landmarks means you can frame the Northern Lights with unforgettable backdrops.
Imagine capturing the aurora over the dramatic cliffs of Þingvellir or the steaming Geysir Geothermal Area. These unique compositions will make your photos stand out and tell a richer story of your Icelandic adventure.
Balancing Sky and Ground: Creating Depth and Interest
To create a visually balanced image, it’s important to pay attention to the ratio of sky to land in your composition.
Including some of the ground—whether it’s snow-covered fields, icy rivers, or volcanic rock formations—provides context and scale to the image. Experiment with different angles and perspectives to find the right balance for each shot.
The Best Times and Conditions for Northern Lights Photography
Understanding Aurora Forecasts and Activity Levels
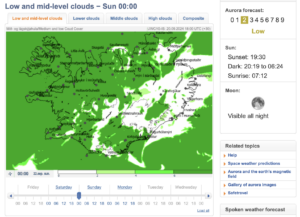
To increase your chances of seeing and photographing the Northern Lights, it’s essential to understand aurora forecasts. Websites and apps like the Icelandic Met Office or Aurora Service provide real-time data on aurora activity (measured in KP index) and cloud cover.
A KP index of 3 or higher is generally good, but even lower levels can produce stunning displays under the right conditions.
The Role of Weather: Clear Skies and Optimal Conditions
Clear skies are a must for Northern Lights photography, so checking the weather forecast is just as important as the aurora forecast. Look for areas with minimal cloud cover and be prepared to be flexible with your plans.
The Hill Hotel’s location away from coastal weather patterns often means clearer skies compared to other parts of Iceland.
Best Months and Times to Catch the Aurora in Iceland
The best time to see the Northern Lights in Iceland is from late September to mid-April, with peak viewing conditions in the months of October, November, February, and March.
The lights are usually visible between 9 PM and 2 AM, but it’s worth staying vigilant throughout the night, as they can appear at any time.
In my personal experience more often than not the most intense moments of the night come around 11pm and 1am. Of course this is not a fact of when to step outside, but it’s my golden rule if standing out waiting for some green to blow my socks off.
Editing Your Northern Lights Photos for Maximum Impact
Basic Editing Tips: Enhancing Colors and Contrast
Start by adjusting the exposure, contrast, and white balance to bring out the colors of the aurora. Use the “Dehaze” tool in Lightroom to reduce any atmospheric haze and make the lights pop.
Be careful not to over-saturate the colors; aim for a natural look that reflects what you experienced.
Using Lightroom and Photoshop for Advanced Edits
For more advanced edits, use Lightroom to selectively adjust highlights and shadows, bringing out details in both the sky and foreground. Photoshop’s layers and masks can be useful for blending multiple exposures or removing distractions.
If your image has noise due to high ISO settings, use noise reduction sparingly to maintain image sharpness.
Avoiding Common Pitfalls: Over-editing and Noise Reduction
It’s easy to get carried away in post-processing, but over-editing can make your photos look unnatural. Avoid pushing colors too far or using excessive noise reduction, which can lead to a loss of detail.
Keep your edits subtle, enhancing the natural beauty of the aurora rather than distorting it.
Top Northern Lights Photography Spots Near The Hill Hotel
Þingvellir National Park: Historic Backdrops and Reflective Lakes
Þingvellir National Park is a UNESCO World Heritage site and a fantastic location for aurora photography. The park’s rugged terrain, fissures, and reflective lakes create stunning compositions.
Capture the lights dancing above the tectonic plates, where Europe and North America meet.
Gullfoss Waterfall: Capturing the Aurora over Iceland’s Iconic Falls
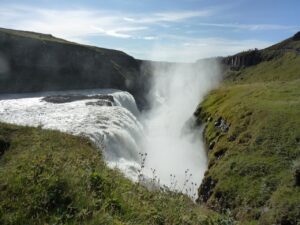
Gullfoss, one of Iceland’s most famous waterfalls, is just a short drive from The Hill Hotel. Imagine the Northern Lights illuminating the cascading water—this dramatic setting makes for truly captivating photos. Be sure to arrive early to set up your shot before the lights appear.
Geysir Geothermal Area: Steamy Landscapes for Unique Compositions
The Geysir Geothermal Area, with its steaming vents and bubbling hot springs, offers a unique foreground for Northern Lights photography.
The steam rising from the ground adds an ethereal quality to your images, contrasting beautifully with the crisp, star-studded sky.
Insider Tips for a Successful Aurora Photography Trip
Planning Your Night: Checking Forecasts and Timing
Always start by checking both the aurora and weather forecasts. Plan your shooting locations based on cloud cover and aurora activity. Have a few backup spots in mind in case conditions change, and be prepared to move quickly to capture the best opportunities.
Staying Comfortable: Managing the Cold for Longer Sessions
Long exposure photography means long hours outside in the cold. Bring plenty of warm drinks and snacks to keep your energy up. Use hand and foot warmers, and take breaks in your car or at a nearby café to warm up. Staying comfortable will help you stay focused and patient.
Also, if you’re not the one driving, a cheeky beer under the lights can also be fun experience and memory to share with your friends back home (stay hydrated also of course!)
Safety Considerations: Navigating Iceland’s Terrain at Night
Shooting at night in unfamiliar terrain can be risky. Always let someone know where you’re going and when you expect to return.
Carry a map, flashlight, and a fully charged phone with emergency contacts saved. Watch out for icy patches, and avoid venturing too close to cliff edges or bodies of water.
Make the Most of Your Stay at The Hill Hotel
Booking Tips for Aurora Chasers

Book your stay at The Hill Hotel well in advance, especially during peak Northern Lights season. Look for packages that include the Aurora wake-up call service and guided tours. The hotel’s staff can also provide local insights on the best viewing spots.
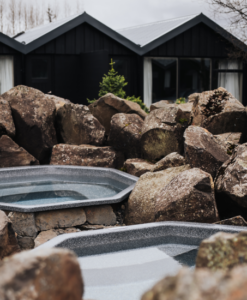
Additional Amenities: Hot Tubs, Fine Dining, and More
After a night of chasing the lights, unwind in The Hill Hotel’s geothermal hot tubs—a perfect way to warm up and relax.
The hotel’s on-site restaurant offers delicious meals made with local ingredients, ideal for refuelling after a long day or night of exploring.
Using the Hill Hotel as a Base for Daytime Adventures
The Hill Hotel isn’t just a great base for Northern Lights photography; it’s also ideally located for exploring Iceland’s daytime wonders.
From hiking to geothermal pools and visiting nearby cultural sites, there’s plenty to fill your days before the night sky takes center stage.
Final Thoughts: Capturing the Magic of Iceland’s Northern Lights

Reflecting on the Experience: More than Just a Photo
Photographing the Northern Lights is about more than just capturing an image—it’s about experiencing one of nature’s most awe-inspiring phenomena. Take time to simply enjoy the moment, and remember that the best memories aren’t always those captured on camera.
Sharing Your Images: Social Media Tips and Best Practices
When sharing your Northern Lights photos, consider the story you want to tell. Use hashtags like #NorthernLights, #Iceland, and #AuroraPhotography to reach a wider audience. Be sure to credit any guides or locations that helped make your shots possible – they love a social fist bump after all.
Planning Your Next Trip: Returning for More Aurora Adventures
Once you’ve experienced the thrill of capturing the Northern Lights, you’ll likely want to do it again. Each trip offers new opportunities and perspectives, so start planning your next adventure—whether it’s returning to Iceland or chasing the aurora in another part of the world.
Conclusion
Mastering the art of photographing the Northern Lights in Iceland is a rewarding journey that combines technical skill with the thrill of adventure. By choosing The Hill Hotel as your base, you set yourself up for an unforgettable experience in one of the world’s best locations for aurora photography. Armed with the right gear, knowledge, and a spirit of exploration, you’ll capture the magic of Iceland’s night sky in ways that will inspire and amaze (trust us, you’ll want to come back). Happy hunting!